微信搜一搜【java金融】回复【666】免费获取bat面试通关手册
引言
以前写了几篇关于SpringBoot的文章《面试高频题:springBoot自动装配的原理你能说出来吗》、《保姆级教程,手把手教你实现一个SpringBoot的starter》,这几天突然有个读者问:能说一说Spring的父子容器吗?说实话这其实也是Spring八股文里面一个比较常见的问题。在我的印象里面Spring就是父容器,SpringMvc就是子容器,子容器可以访问父容器的内容,父容器不能访问子容器的东西。有点类似java里面的继承的味道,子类可以继承父类共有方法和变量,可以访问它们,父类不可以访问子类的方法和变量。在这里就会衍生出几个比较经典的问题:
为什么需要父子容器?
是否可以把所有类都通过
Spring容器来管理?(Spring的applicationContext.xml中配置全局扫描)是否可以把我们所需的类都放入
Spring-mvc子容器里面来管理(springmvc的spring-servlet.xml中配置全局扫描)?同时通过两个容器同时来管理所有的类?
如果能够把上面这四个问题可以说个所以然来,个人觉得Spring的父子容器应该问题不大了。
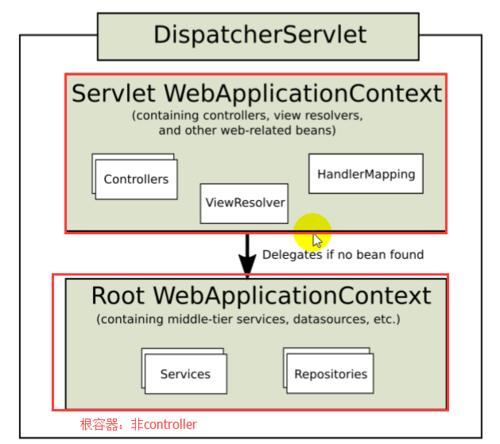
我们可以看下官网提供的父子容器的图片
上图中显示了2个WebApplicationContext实例,为了进行区分,分别称之为:Servlet WebApplicationContext(子容器)、Root WebApplicationContext(父容器)。Servlet WebApplicationContext:这是对J2EE三层架构中的
web层进行配置,如控制器(controller)、视图解析器(view resolvers)等相关的bean。通过spring mvc中提供的DispatchServlet来加载配置,通常情况下,配置文件的名称为spring-servlet.xml。Root WebApplicationContext:这是对J2EE三层架构中的
service层、dao层进行配置,如业务bean,数据源(DataSource)等。通常情况下,配置文件的名称为applicationContext.xml。在web应用中,其一般通过ContextLoaderListener来加载。Spring的启动
要想很好的理解它们之间的关系,我们就有必要先弄清楚Spring的启动流程。要弄清楚这个启动流程我们就需要搭建一个
SpringMvc项目,说句实话,用惯了SpringBooot开箱即用,突然在回过头来搭建一个SpringMvc项目还真有点不习惯,一大堆的配置文件。(虽然也可以用注解来实现)具体怎么搭建SpringMvc项目这个就不介绍了,搭建好项目我们运行起来可以看到控制台会输出如下日志:
日志里面分别打印出了父容器和子容器分别的一个耗时。如何验证是有两个容器?
我们只需要
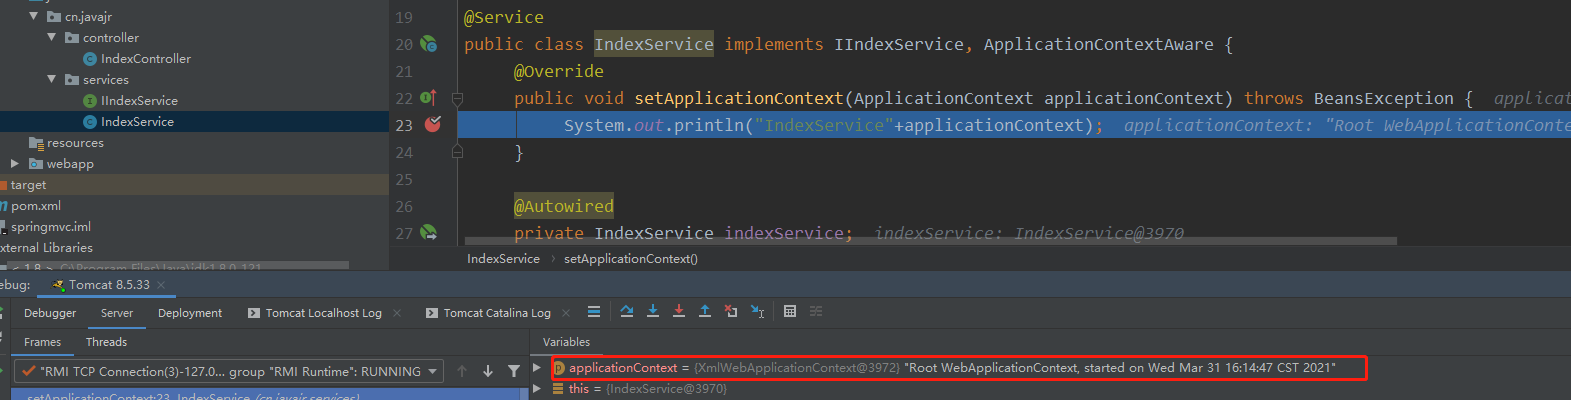
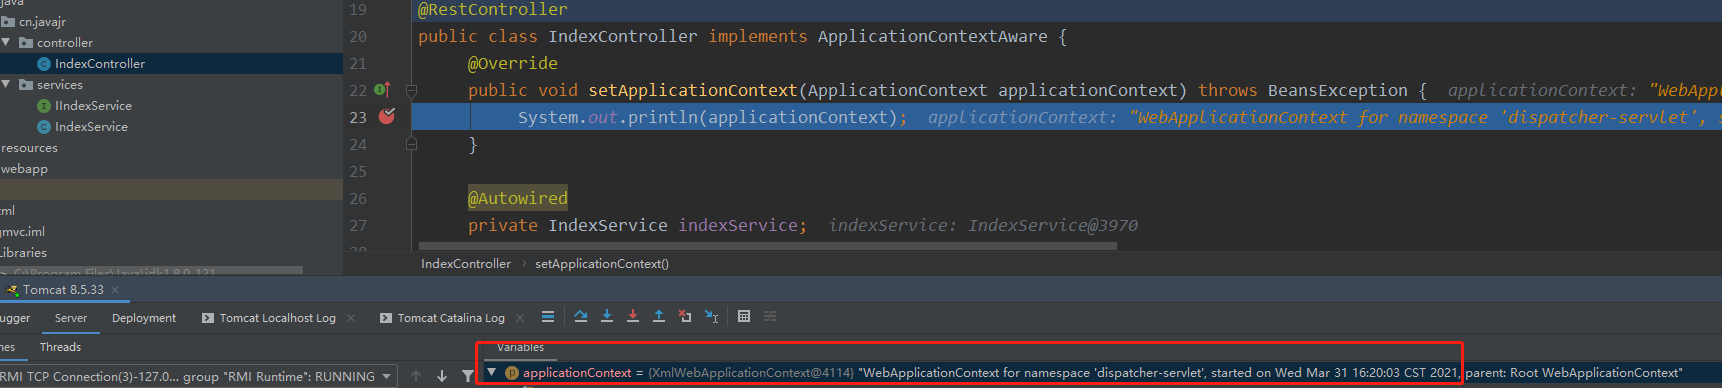
Controller与我们的Service中实现ApplicationContextAware接口,就可已得知对应的管理容器:
在Service所属的父容器里面我们可以看到父容器对应的对象是XmlWebApplicationContext@3972
在Controller中对应的容器对象是XmlWebApplicationContext@4114
由此可见它们是两个不同的容器。源码分析
我们知道
SpringServletContainerInitializer从servlet 3.0开始,Tomcat启动时会自动加载实现了ServletContainerInitializer
接口的类(需要在META-INF/services目录下新建配置文件)也称为SPI(Service Provider Interface)机制,SPI的应用还是挺广的比如我们的JDBC、还有Dubbo框架里面都有用到,如果还有不是很了解SPI机制的
可以去学习下。所以我们的入口就是SpringServletContainerInitializer的onStartup方法,这也应该是web容器启动调用Spring相关的第一个方法。初始化SpringIoc
如果实在找不到入口的话,我们可以 根据控制台打印的日志,然后拿着日志进行反向查找这应该总能找到开始加载父容器的地方。启动的时候控制台应该会打印出“
Root WebApplicationContext: initialization started”
我们拿着这个日志就能定位到代码了public WebApplicationContext initWebApplicationContext(ServletContext servletContext) { if (servletContext.getAttribute(WebApplicationContext.ROOT_WEB_APPLICATION_CONTEXT_ATTRIBUTE) != null) { throw new IllegalStateException( "Cannot initialize context because there is already a root application context present - " + "check whether you have multiple ContextLoader* definitions in your web.xml!"); } servletContext.log("Initializing Spring root WebApplicationContext"); Log logger = LogFactory.getLog(ContextLoader.class); if (logger.isInfoEnabled()) { logger.info("Root WebApplicationContext: initialization started"); } long startTime = System.currentTimeMillis(); try { // Store context in local instance variable, to guarantee that // it is available on ServletContext shutdown. if (this.context == null) { // 通过反射去创建context this.context = createWebApplicationContext(servletContext); } if (this.context instanceof ConfigurableWebApplicationContext) { ConfigurableWebApplicationContext cwac = (ConfigurableWebApplicationContext) this.context; if (!cwac.isActive()) { // The context has not yet been refreshed -> provide services such as // setting the parent context, setting the application context id, etc if (cwac.getParent() == null) { // The context instance was injected without an explicit parent -> // determine parent for root web application context, if any. ApplicationContext parent = loadParentContext(servletContext); cwac.setParent(parent); } // IOC容器初始化 configureAndRefreshWebApplicationContext(cwac, servletContext); } } servletContext.setAttribute(WebApplicationContext.ROOT_WEB_APPLICATION_CONTEXT_ATTRIBUTE, this.context); ClassLoader ccl = Thread.currentThread().getContextClassLoader(); if (ccl == ContextLoader.class.getClassLoader()) { currentContext = this.context; } else if (ccl != null) { currentContextPerThread.put(ccl, this.context); } if (logger.isInfoEnabled()) { long elapsedTime = System.currentTimeMillis() - startTime; logger.info("Root WebApplicationContext initialized in " + elapsedTime + " ms"); } return this.context; } catch (RuntimeException | Error ex) { logger.error("Context initialization failed", ex); servletContext.setAttribute(WebApplicationContext.ROOT_WEB_APPLICATION_CONTEXT_ATTRIBUTE, ex); throw ex; } }这段代码就是创建父容器的地方。
初始化 Spring MVC
接着我们再来看看创建子容器的地方:在
FrameworkServlet类
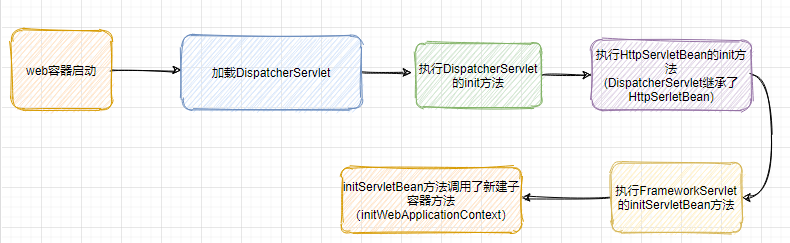
上述代码是不是会有个疑问我们怎么就会执行FrameworkServlet的initServletBean方法。
这是由于我们在web.xml里面配置了DispatcherServlet,然后web容器就会去调用DispatcherServlet的init方法,并且这个方法只会被执行一次。通过init方法就会去执行到initWebApplicationContext这个方法了,这就是web子容器的一个启动执行顺序。<servlet> <servlet-name>dispatcher</servlet-name> <servlet-class>org.springframework.web.servlet.DispatcherServlet</servlet-class> // 如果不配置这个load-on-startup 1 不会再项目启动的时候执行inti方法。而是首次访问再启动 <load-on-startup>1</load-on-startup> </servlet>大概流程如下:
从上述代码我们可以发现子容器是自己重新通过反射new了一个新的容器作为子容器,
并且设置自己的父容器为Spring初始化创建的WebApplicationContext。然后就是去加载我们在web.xml里面配置的Springmvc的配置文件,然后通过创建的子容器去执行refresh方法,这个方法我相信很多人应该都比较清楚了。问题解答
我们知道了
Sping父容器以及SpingMvc子容器的一个启动过程,以及每个容器都分别干了什么事情现在再回过头来看看上述四个问题。为什么需要父子容器?
父子容器的主要作用应该是划分框架边界。有点单一职责的味道。
在J2EE三层架构中,在service层我们一般使用spring框架来管理, 而在web层则有多种选择,如spring mvc、struts等。因此,通常对于web层我们会使用单独的配置文件。例如在上面的案例中,一开始我们使用spring-servlet.xml来配置web层,使用applicationContext.xml来配置service、dao层。如果现在我们想把web层从spring mvc替换成struts,那么只需要将spring-servlet.xml替换成Struts的配置文件struts.xml即可,而applicationContext.xml不需要改变。是否可以把所有类都通过Spring父容器来管理?(Spring的applicationContext.xml中配置全局扫描)
所有的类都通过父容器来管理的配置就是如下:<context:component-scan use-default-filters="false" base-package="cn.javajr"> <context:include-filter type="annotation" expression="org.springframework.stereotype.Service" /> <context:include-filter type="annotation" expression="org.springframework.stereotype.Component" /> <context:include-filter type="annotation" expression="org.springframework.stereotype.Repository" /> <context:include-filter type="annotation" expression="org.springframework.stereotype.Controller" /> </context:component-scan>然后在
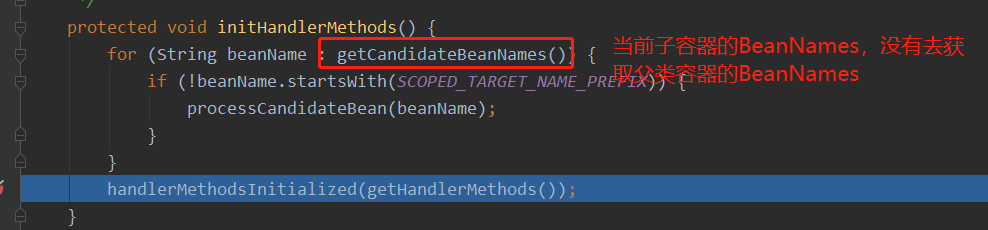
SpringMvc的配置里面不配置扫描包路劲。很显然这种方式是行不通的,这样会导致我们请求接口的时候产生404。因为在解析@ReqestMapping注解的过程中initHandlerMethods()函数只是对Spring MVC容器中的bean进行处理的,并没有去查找父容器的bean, 因此不会对父容器中含有@RequestMapping注解的函数进行处理,更不会生成相应的handler。所以当请求过来时找不到处理的handler,导致404。是否可以把我们所需的类都放入Spring-mvc子容器里面来管理(springmvc的spring-servlet.xml中配置全局扫描)?
这个是把包的扫描配置spring-servlet.xml中这个是可行的。为什么可行因为无非就是把所有的东西全部交给子容器来管理了,子容器执行了refresh方法,把在它的配置文件里面的东西全部加载管理起来来了。虽然可以这么做不过一般应该是不推荐这么去做的,一般人也不会这么干的。如果你的项目里有用到事物、或者aop记得也需要把这部分配置需要放到Spring-mvc子容器的配置文件来,不然一部分内容在子容器和一部分内容在父容器,可能就会导致你的事物或者AOP不生效。(这里不就有个经典的八股文吗?你有遇到事物不起作用的时候,其实这也是一种情况)同时通过两个容器同时来管理所有的类?
这个问题应该是比较好回答了,肯定不会通过这种方式来的,先不说会不会引发其他问题,首先两个容器里面都放一份一样的对象,造成了内存浪费。再者的话子容器会覆盖父容器加载,本来可能父容器配置了事物生成的是代理对象,但是被子容器一覆盖,又成了原生对象。这就导致了你的事物不起作用了。
在补充一个问题:SpringBoot 里面是否还有父子容器?我们下篇再见!总结
其实父子容器对于程序员来说是无感的,是一个并没有什么用的知识点,都是
Spring帮我们处理了,但是我们还是需要知道有这么个东西,不然我们有可能遇到问题的时候可能不知道如何下手。比如为啥我这个事物不起作用了,我这个aop怎么也不行了,网上都是这么配置的。结束
由于自己才疏学浅,难免会有纰漏,假如你发现了错误的地方,还望留言给我指出来,我会对其加以修正。
如果你觉得文章还不错,你的转发、分享、赞赏、点赞、留言就是对我最大的鼓励。
感谢您的阅读,十分欢迎并感谢您的关注。
站在巨人的肩膀上摘苹果:
https://www.cnblogs.com/grasp/p/11042580.html